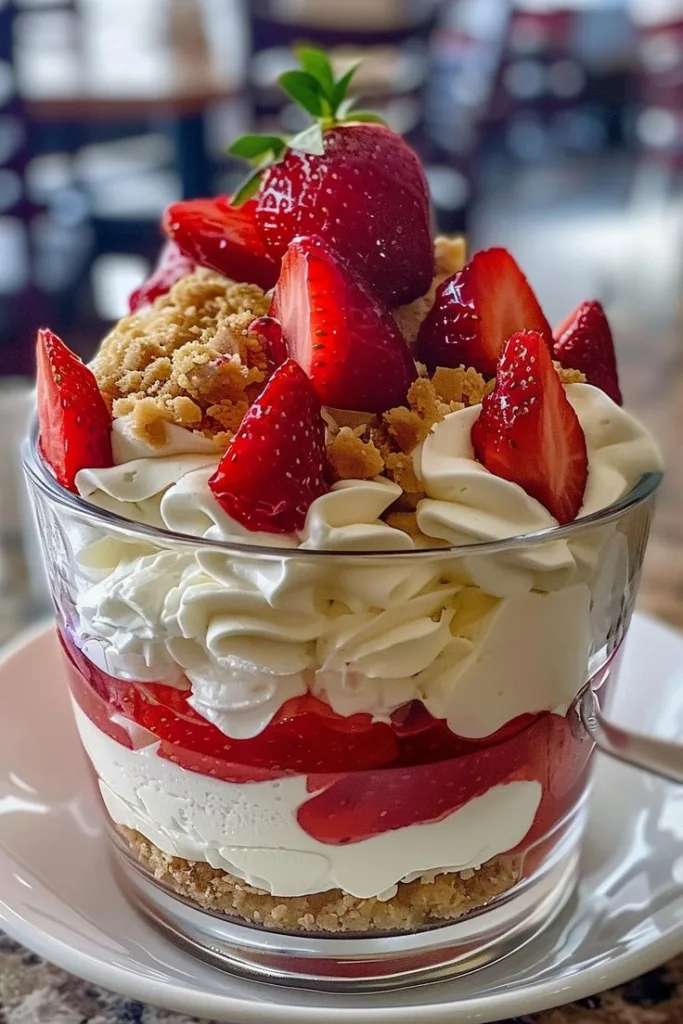
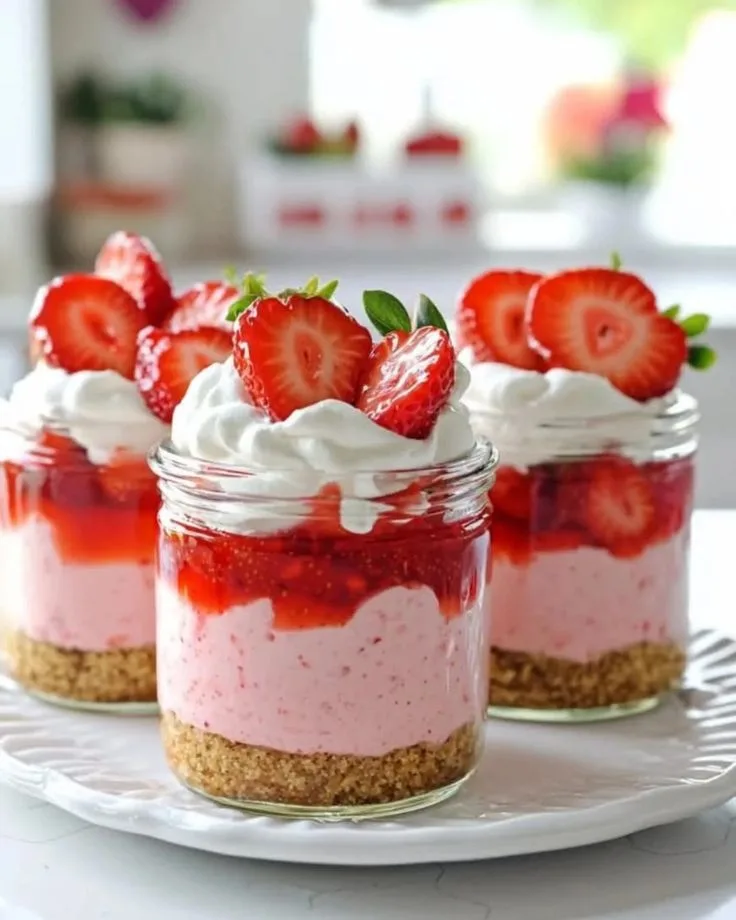
Strawberry Crunch Cheesecake Cups are a fun, individual-sized dessert that packs all the flavor of a traditional cheesecake with an exciting, crunchy twist. These no-bake treats feature a smooth, creamy cheesecake filling topped with a sweet, strawberry-flavored crunch that will delight your taste buds. The layers of velvety cheesecake, fresh strawberries, and buttery graham cracker crust come together in the perfect bite-sized portion, making them perfect for parties, picnics, or just satisfying your sweet tooth. With minimal prep time and no baking required, these cheesecake cups are both easy and elegant.
What Makes This Dessert Special?
Strawberry Crunch Cheesecake Cups combine the best of both worlds: the creamy richness of cheesecake and the delightful crunch of a strawberry-flavored topping. The cheesecake filling is luscious and perfectly balanced with the sweet, tangy flavor of fresh strawberries. The crunchy topping adds texture and sweetness that contrasts with the smoothness of the cheesecake. These cups are perfect for serving at gatherings, offering a personal touch with their individual servings while still being easy to prepare and serve.
Cooking Time
- Prep Time: 20 minutes
- Chill Time: 2 hours
- Total Time: 2 hours 20 minutes
- Servings: 6 cups
Ingredients
For the Cheesecake Filling:
- 8 oz cream cheese, softened
- ½ cup powdered sugar
- 1 tsp vanilla extract
- 1 cup heavy whipping cream
- 1 tbsp lemon juice (optional, for extra tang)
For the Strawberry Crunch Topping:
- 1 box strawberry-flavored Jell-O (3 oz)
- 1 cup graham cracker crumbs
- ¼ cup sugar
- 1 stick (½ cup) unsalted butter, melted
For the Crust:
- 1 cup graham cracker crumbs
- 3 tbsp melted butter
- 2 tbsp sugar
Instructions
1. Prepare the Crust
In a small bowl, combine the graham cracker crumbs, sugar, and melted butter. Stir until the crumbs are evenly coated. Spoon about 2 tablespoons of the mixture into the bottom of each serving cup and press it down firmly with the back of a spoon. Set aside.
2. Make the Cheesecake Filling
In a mixing bowl, beat the softened cream cheese with powdered sugar and vanilla extract until smooth and creamy. In a separate bowl, whip the heavy cream until stiff peaks form. Gently fold the whipped cream into the cream cheese mixture, ensuring it’s well combined and fluffy. If you want a little tang, add the lemon juice and mix.
3. Prepare the Strawberry Crunch Topping
In another bowl, combine the strawberry Jell-O powder, graham cracker crumbs, sugar, and melted butter. Mix until everything is well combined, creating a crumbly, sticky topping.
4. Assemble the Cups
Spoon the cheesecake filling over the prepared crust in each cup, filling them about halfway. Top with the strawberry crunch topping, pressing it lightly to help it stick. Add a few fresh strawberry slices or a dollop of whipped cream on top for extra decoration.
5. Chill and Serve
Refrigerate the cheesecake cups for at least 2 hours to allow them to set properly. Serve chilled for the best texture and flavor.

Variations
- Berry Mix: Swap the strawberry Jell-O for raspberry or blueberry Jell-O for a different fruity flavor.
- Chocolate Crust: Use chocolate graham cracker crumbs for a richer, chocolatey twist.
- Extra Toppings: Add a drizzle of chocolate syrup or caramel sauce over the top for added sweetness.
- Nutty Crunch: Stir in chopped pecans or almonds into the strawberry crunch topping for extra texture.
Equipment You’ll Need
- Mixing bowls
- Hand mixer or stand mixer
- Serving cups (ramekins or mason jars work great)
- Spoon or spatula
- Whisk
Nutritional Information (Approx. Per Serving)
- Calories: ~300
- Carbohydrates: 30g
- Fat: 20g
- Protein: 3g
- Sugar: 18g
Note: Nutrition may vary depending on ingredient brands and portion size.
Storage Tips
- Refrigeration: Keep the cheesecake cups refrigerated for up to 3 days.
- Freezing: These cups can be frozen for up to 1 month. To serve, let them thaw in the fridge for a few hours before eating.
- Make-Ahead: Prepare the cups a day in advance and store them in the fridge for a convenient and easy dessert.
My Cooking Experience
These Strawberry Crunch Cheesecake Cups are always a hit whenever I make them! The combination of creamy cheesecake and the crunchy topping gives a fun twist to a classic dessert. I love how easy they are to put together, and the individual cups make them perfect for sharing with friends and family. Plus, the strawberry crunch topping is always a crowd favorite! It’s one of those desserts that looks impressive but requires very little effort—just the kind of recipe I enjoy.
Conclusion
Strawberry Crunch Cheesecake Cups are the perfect balance of creamy and crunchy, with just the right amount of sweetness and tang. These easy, no-bake cups are sure to be a hit at any occasion, from casual get-togethers to fancy celebrations. With a buttery graham cracker crust, creamy cheesecake filling, and strawberry crunch topping, these cups will become a go-to dessert in your repertoire. Make them for your next gathering, and they’ll be gone before you know it!
Strawberry Crunch Cheesecake Cups
Ingredients
Method
- In a small bowl, combine the graham cracker crumbs, sugar, and melted butter. Stir until the crumbs are evenly coated. Spoon about 2 tablespoons of the mixture into the bottom of each serving cup and press it down firmly with the back of a spoon. Set aside.
- In a mixing bowl, beat the softened cream cheese with powdered sugar and vanilla extract until smooth and creamy. In a separate bowl, whip the heavy cream until stiff peaks form. Gently fold the whipped cream into the cream cheese mixture, ensuring it’s well combined and fluffy. If you want a little tang, add the lemon juice and mix.
- In another bowl, combine the strawberry Jell-O powder, graham cracker crumbs, sugar, and melted butter. Mix until everything is well combined, creating a crumbly, sticky topping.
- Spoon the cheesecake filling over the prepared crust in each cup, filling them about halfway. Top with the strawberry crunch topping, pressing it lightly to help it stick. Add a few fresh strawberry slices or a dollop of whipped cream on top for extra decoration.
- Refrigerate the cheesecake cups for at least 2 hours to allow them to set properly. Serve chilled for the best texture and flavor.
Notes
- Refrigeration: Keep the cheesecake cups refrigerated for up to 3 days.
- Freezing: These cups can be frozen for up to 1 month. To serve, let them thaw in the fridge for a few hours before eating.


